
Keto Strawberry Cream Cheese Cobbler (No Watery Filling)
 • September 30, 2026
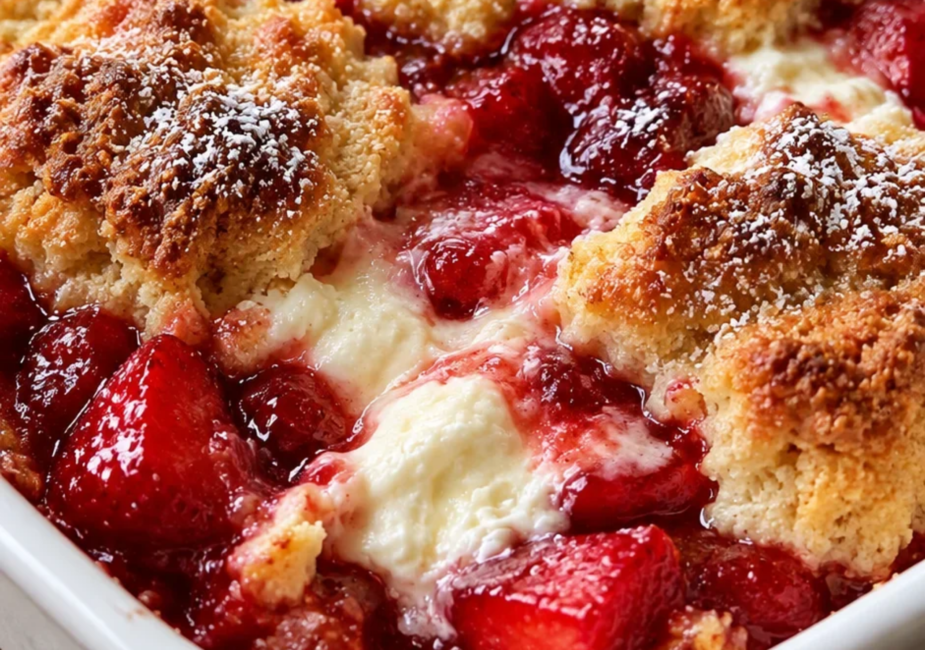
Strawberries go on sale, you buy way too many, and by day three you’re staring at a container wondering if it’s shortcake again or something new. This cobbler is the something new a low-carb dessert where sweet, jammy strawberries meet pockets of tangy cream cheese under a buttery almond flour topping.
Most keto fruit desserts turn out either bland or soupy, since without regular flour or cornstarch to lean on, the filling has nowhere to go but watery. This one solves that before it ever hits the oven. Here’s how it comes together.
Why You’ll Love It
- The filling doesn’t turn to soup. Draining the macerated strawberries before baking instead of dumping them straight in, juice and all is the single biggest fix for the runny-cobbler problem most keto versions run into.
- Real cream cheese pockets, not just a flavor note. Dolloping it in rather than fully stirring it through means you get actual tangy bites instead of a uniform pink filling.
- The topping bakes up genuinely crisp, not the slightly damp, gritty texture almond flour toppings can end up with.
- It’s naturally low-carb and gluten-free, no swaps required.
- One dish, minimal prep there’s no separate crust to blind-bake or roll out.
- It reheats into something close to fresh-baked, which most fruit desserts can’t claim.
Recipe At a Glance
- Prep time: 15 minutes
- Cook time: 35 minutes
- Total time: 50 minutes
- Servings: 8
- Estimated calories: ~245 per serving
- Estimated macros: ~6g protein, ~7g net carbs, ~21g fat (estimates only will vary based on the exact sweetener and strawberry ripeness)
Ingredients
For the filling:
- 4 cups fresh strawberries, hulled and sliced
- ¼ cup granulated allulose or erythritol blend
- 1 tablespoon lemon juice
- ½ teaspoon xanthan gum
- 6 oz cream cheese, softened and cut into small dollops
- 1 teaspoon vanilla extract
For the topping:
- 1½ cups almond flour
- 2 tablespoons coconut flour
- ¼ cup granulated allulose or erythritol blend
- 1½ teaspoons baking powder
- ¼ teaspoon salt
- 4 tablespoons unsalted butter, melted
- 1 large egg
Ingredient notes: Allulose browns more naturally than erythritol and won’t leave that slightly cooling aftertaste, so it’s worth seeking out if your grocery store carries it. Use full-fat block cream cheese, not the spreadable tub kind the tub version is looser and tends to melt into the filling instead of holding its shape as distinct pockets.
Equipment Needed
- 9×9-inch baking dish
- Two mixing bowls
- Fine-mesh strainer
- Hand mixer (or a sturdy whisk)
Step-by-Step Instructions
1. Macerate the strawberries. Toss the sliced strawberries with the sweetener and lemon juice in a bowl. Let them sit at room temperature for 15 minutes this pulls extra liquid out of the berries before they ever hit the oven.
2. Drain, then thicken. Preheat your oven to 350°F. Pour the macerated strawberries into a fine-mesh strainer set over a bowl and let the juice drain off for a couple of minutes, pressing gently. Discard the drained juice (or save it to stir into sparkling water later). This is the step that actually keeps the cobbler from turning soupy that released liquid has nowhere to cook off inside a covered filling, so removing it upfront does the work that flour or cornstarch would normally handle. Toss the drained berries with the xanthan gum and vanilla until no dry streaks remain.
3. Layer the filling. Spread the strawberries into the baking dish in an even layer. Dot the cream cheese pieces over the top, leaving gaps between them rather than spreading it into one solid layer. Pro tip: cream cheese that’s fully softened (not just microwaved for a few seconds) will dollop more evenly and won’t sink all the way to the bottom as it bakes.
4. Make the topping. In a separate bowl, whisk together the almond flour, coconut flour, sweetener, baking powder, and salt. Add the melted butter and egg, stirring until a thick, scoopable batter forms.
5. Top and bake. Drop spoonfuls of the topping over the strawberry layer, leaving some gaps so the filling can bubble through. Bake for 30–35 minutes, until the topping is golden and the filling is bubbling visibly at the edges.
6. Cool slightly before serving. Let the cobbler rest for at least 10 minutes before serving the filling firms up as it cools, and serving it too hot will give you a looser, less structured bite.
Common Mistakes to Avoid
- Skipping the drain step. This is the exact issue that turns a keto cobbler watery without regular flour to absorb liquid, that released juice has to go somewhere, and “somewhere” is your dish.
- Using spreadable tub cream cheese. It’s too soft to hold its shape and tends to disappear into the filling instead of staying in distinct pockets.
- Skipping the rest time after baking. A cobbler pulled straight from the oven and served immediately will taste looser and less set than it actually is.
- Overmixing the topping batter. A few lumps are fine overworking it makes the topping denser instead of tender.
- Using underripe strawberries. They release less natural sweetness and juice, which throws off both flavor and the amount of liquid you’re draining in step 2.
How to Store & Reheat
Refrigerator: Cover and store for up to 4 days. The topping softens slightly but the flavor holds up well.
Freezer: Freeze individual portions in an airtight container for up to 2 months. Thaw overnight in the fridge before reheating.
Reheating: Warm individual portions in a 325°F oven for about 10 minutes to re-crisp the topping. A microwave works too, but the topping will stay soft rather than crisp.
Recipe Variations & Substitutions
- Mixed berry version: Swap half the strawberries for raspberries or blackberries for a more complex filling.
- Dairy-free: Use a dairy-free cream cheese alternative and swap the butter for coconut oil in the topping.
- Nut-free: Replace the almond flour with a 1:1 sunflower seed flour swap, though the topping will brown slightly darker.
- Extra tangy: Add ½ teaspoon of lemon zest to the filling along with the lemon juice.
- Crunchier topping: Sprinkle a tablespoon of chopped pecans over the topping before baking.
- Single-serve version: Divide the filling and topping between individual ramekins and reduce the bake time to about 20 minutes.
Nutritional & Health Angle
This cobbler leans on fresh strawberries for natural sweetness and fiber, with almond flour standing in for the higher-carb flour and sugar a traditional cobbler relies on. Cream cheese adds a bit of protein alongside the fat, which helps this dessert feel more satisfying than a straight sugar-and-flour version. As always, exact nutrition will vary based on your specific sweetener and ingredient brands the numbers above are estimates, not medical guidance.
Frequently Asked Questions
Can I use frozen strawberries?
Yes, but thaw them fully and drain them extra well before macerating, since frozen berries release significantly more liquid than fresh ones.
Do I have to use xanthan gum?
It helps hold the filling together, but you can leave it out if you don’t have any just expect a slightly looser, juicier filling.
Can I make this ahead of time?
You can prep the filling and topping separately up to a day ahead and store them in the fridge, then assemble and bake right before serving.
Why did my topping turn out dense?
This usually means the batter was overmixed, or the almond flour was measured too heavily by scooping straight from the bag instead of spooning it into the measuring cup.
Is this recipe gluten-free?
Yes, both the filling and topping are naturally gluten-free as written.
Can I substitute a different sweetener?
Most granulated erythritol or allulose blends work interchangeably here; just avoid liquid sweeteners like maple syrup, since they’ll throw off the topping’s texture.
Final Thoughts
Draining those macerated strawberries feels like an extra step when you’re standing there with juicy berries ready to go, but it’s genuinely what keeps this cobbler from turning into strawberry soup under a biscuit lid. Once you’ve made it that way, it’s hard to go back to skipping it. If you make this one, I’d love to know how it turned out for you drop a rating below.
Keto Strawberry Cream Cheese Cobbler
Last modified: September 30, 2026