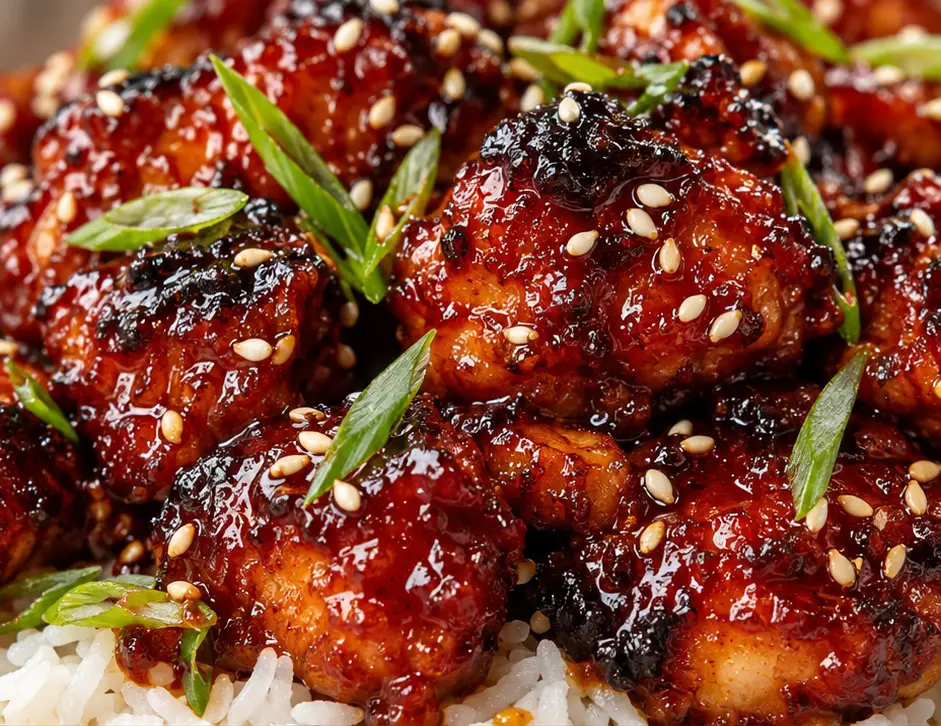
Delivery apps have convinced a lot of people that sticky, glazed chicken is something you order, not something you make on a random weeknight. It isn’t. The truth is that most of what makes takeout-style gochujang chicken good the glossy glaze, the balance of sweet and spicy, the way it clings instead of pooling in the bottom of the container comes down to one sauce technique, not a fryer or a restaurant-grade wok.
This version skips the deep-frying entirely and still gets that same sticky, lacquered finish. Here’s how it comes together.
Why You’ll Love It
- One pan, no deep-frying the chicken sears in a skillet and the glaze builds right in the same pan.
- The glaze actually clings instead of pooling finishing it with a small cornstarch slurry at the very end, rather than simmering it in from the start, is what keeps it glossy and thick without turning gluey. More on that below.
- Real heat with real balance gochujang brings a fermented depth that plain hot sauce can’t match, and honey rounds it out instead of masking it.
- Ready faster than delivery in most cases, start to finish.
- Kid-adjustable spice level dial the gochujang up or down without changing the rest of the recipe.
- Leftovers reheat beautifully, with the glaze staying just as glossy the next day.
Recipe At a Glance
- Prep time: 10 minutes
- Cook time: 20 minutes
- Total time: about 30 minutes
- Servings: 4
- Estimated calories: ~410 per serving (estimate; varies by chicken cut and honey amount)
- Estimated macros: ~31g protein, ~26g carbs, ~19g fat per serving
(Nutrition figures are estimates based on standard ingredient values, not a lab analysis — use them as a general guide.)
Ingredients
For the chicken:
- 1.5 lbs boneless, skinless chicken thighs, cut into bite-sized pieces
- 1 tablespoon vegetable oil
- Salt and pepper, to taste
- 1 tablespoon cornstarch (for coating the chicken)
For the sauce:
- 3 tablespoons gochujang (Korean chili paste)
- 2 tablespoons soy sauce
- 2 tablespoons honey
- 1 tablespoon rice vinegar
- 1 teaspoon sesame oil
- 3 garlic cloves, minced
- 1 teaspoon fresh ginger, grated
- ⅓ cup water
To finish:
- 1 teaspoon cornstarch mixed with 1 tablespoon cold water (slurry)
- 2 green onions, sliced
- 1 teaspoon sesame seeds
Ingredient notes: Gochujang brands vary a lot in saltiness and heat, so start with the amount listed and taste the sauce before adjusting some brands are noticeably spicier than others. If you can’t find gochujang locally, most Asian grocery stores or the international aisle of larger supermarkets carry it, and it keeps in the fridge for months once opened.
Equipment Needed
- Large skillet or wok
- Small mixing bowl (for the slurry)
- Tongs
Step-by-Step Instructions
Step 1: Coat and sear the chicken:
Toss the chicken pieces with salt, pepper, and 1 tablespoon cornstarch until lightly coated. Heat the vegetable oil in a large skillet over medium-high heat, then add the chicken in a single layer and sear for 5–6 minutes per side, until golden and cooked through (internal temperature of 165°F). Remove to a plate.
Step 2: Build the sauce base:
In the same skillet, reduce heat to medium and add the gochujang, soy sauce, honey, rice vinegar, sesame oil, garlic, ginger, and water. Whisk together until smooth, scraping up any browned bits left from the chicken.
Step 3: Simmer until glossy:
Let the sauce simmer for 2–3 minutes, until it starts to thicken slightly and smells fragrant rather than sharp. It should coat the back of a spoon lightly at this stage, but don’t expect it to be fully thick yet.
Step 4: Finish with the slurry, not before:
Stir the cornstarch slurry, then pour it into the simmering sauce while stirring constantly. Let it bubble for 30–60 seconds, until the sauce turns glossy and visibly thickens. Adding the slurry at the very end instead of simmering cornstarch in from the start is what keeps the glaze clingy and glossy rather than gluey cornstarch added too early and cooked too long can break down and turn the sauce gummy or start to thin back out.
Step 5: Return the chicken to the pan:
Add the seared chicken back into the skillet and toss to coat every piece in the glaze, cooking for another minute so the sauce clings evenly.
Step 6: Garnish and serve:
Top with sliced green onions and sesame seeds, and serve over rice. If you want a lighter side to balance the richness, our Quick Pickled Cucumber Salad is a natural pairing here.
Common Mistakes to Avoid
- Adding cornstarch to the sauce too early. This is exactly what leads to a gummy or overly thin glaze hold the slurry until the very end.
- Overcrowding the skillet when searing. Too much chicken at once steams instead of browns, and you lose the texture contrast the glaze is supposed to sit on top of.
- Using a very spicy gochujang brand without tasting first. Heat levels vary widely between brands, so taste the sauce before committing to the full amount.
- Simmering the sauce too long before adding the chicken back. The glaze can scorch or turn bitter if it sits too long over direct heat before the chicken goes back in.
- Skipping the coating step on the chicken. The light cornstarch coating helps the glaze actually cling to the meat instead of sliding off.
How to Store & Reheat
Store leftovers in an airtight container in the fridge for up to 4 days. This dish also freezes reasonably well for up to 2 months, though the glaze may need a quick re-thicken after thawing.
To reheat, warm in a skillet over medium-low heat with a splash of water, stirring occasionally, until the chicken is heated through and the glaze loosens back up, about 5 minutes. The microwave works in a pinch cover loosely and heat in 30-second bursts to avoid drying out the chicken.
Recipe Variations & Substitutions
- Milder version: Cut the gochujang to 2 tablespoons and add an extra tablespoon of honey to keep the balance while lowering the heat.
- Gluten-free: Use tamari or a gluten-free soy sauce alternative, and double-check your specific gochujang brand, since some contain wheat.
- Chicken breast instead of thighs: Works fine just watch the sear time closely since breast meat cooks faster and dries out more easily than thigh.
- Extra vegetables: Toss in broccoli florets or sliced bell peppers with the chicken at the end to make it a more complete one-pan meal.
- Air fryer chicken option: Air fry the coated chicken pieces at 400°F for 10–12 minutes instead of pan-searing, then toss with the stovetop-made sauce.
- Lower-sugar version: Swap the honey for a monk fruit or allulose-based syrup at a 1:1 ratio if you’re watching added sugar.
Nutritional & Health Angle
This dish leans on lean protein from the chicken thighs balanced against a moderate amount of added sugar from the honey, which is fairly typical for a glazed-style dish like this. Serving it over a base of rice or alongside steamed vegetables is an easy way to round out the meal without leaning too heavily on the glaze for volume. This isn’t a specifically health-focused recipe, just a homemade version of a flavor profile people usually reach for from a menu.
FAQ
Can I make this less spicy for kids?
Yes — reduce the gochujang to 1½–2 tablespoons and add an extra tablespoon of honey to keep the sauce balanced while toning down the heat significantly.
What can I substitute for gochujang?
A mix of sriracha and a small amount of miso paste can approximate the flavor in a pinch, though the depth won’t be quite the same as real gochujang.
Can I make this ahead of time?
You can sear the chicken and make the sauce base ahead, storing them separately, then combine and finish with the slurry just before serving for the best glossy texture.
Why did my sauce turn out thin instead of sticky?
This usually means the slurry wasn’t given enough time to simmer after being added let it bubble for a full 30–60 seconds so the cornstarch can fully activate and thicken.
Is this recipe gluten-free?
Not as written, since regular soy sauce and some gochujang brands contain wheat swap in tamari and a verified gluten-free gochujang to make it fully gluten-free.
Can I use chicken breast instead of thighs?
Yes, though it cooks faster and dries out more easily, so reduce the sear time slightly and keep a closer eye on the internal temperature.
Final Thoughts
The whole dish comes together fast, but that last step of finishing the glaze with a quick cornstarch slurry instead of simmering it in early is what gives it that genuinely sticky, glossy coating instead of a thin, saucy mess. It’s a small adjustment that makes a real difference in how the dish looks and eats.
If you end up making this, I’d love to know how would you rate the spice level as written?
For the chicken:
- 1.5 lbs boneless skinless chicken thighs, cut into bite-sized pieces
- 1 tablespoon vegetable oil
- Salt and pepper to taste
- 1 tablespoon cornstarch for coating the chicken
For the sauce:
- 3 tablespoons gochujang Korean chili paste
- 2 tablespoons soy sauce
- 2 tablespoons honey
- 1 tablespoon rice vinegar
- 1 teaspoon sesame oil
- 3 garlic cloves minced
- 1 teaspoon fresh ginger grated
- ⅓ cup water
To finish:
- 1 teaspoon cornstarch mixed with 1 tablespoon cold water slurry
- 2 green onions sliced
- 1 teaspoon sesame seeds
Coat and sear the chicken: Toss the chicken pieces with salt, pepper, and 1 tablespoon cornstarch until lightly coated. Heat the vegetable oil in a large skillet over medium-high heat, then add the chicken in a single layer and sear for 5–6 minutes per side, until golden and cooked through (internal temperature of 165°F). Remove to a plate.
Build the sauce base: In the same skillet, reduce heat to medium and add the gochujang, soy sauce, honey, rice vinegar, sesame oil, garlic, ginger, and water. Whisk together until smooth, scraping up any browned bits left from the chicken.
Simmer until glossy: Let the sauce simmer for 2–3 minutes, until it starts to thicken slightly and smells fragrant rather than sharp. It should coat the back of a spoon lightly at this stage, but don't expect it to be fully thick yet.
Finish with the slurry, not before: Stir the cornstarch slurry, then pour it into the simmering sauce while stirring constantly. Let it bubble for 30–60 seconds, until the sauce turns glossy and visibly thickens. Adding the slurry at the very end instead of simmering cornstarch in from the start is what keeps the glaze clingy and glossy rather than gluey — cornstarch added too early and cooked too long can break down and turn the sauce gummy or start to thin back out.
Return the chicken to the pan: Add the seared chicken back into the skillet and toss to coat every piece in the glaze, cooking for another minute so the sauce clings evenly.
Garnish and serve: Top with sliced green onions and sesame seeds, and serve over rice. If you want a lighter side to balance the richness, our Quick Pickled Cucumber Salad is a natural pairing here.
One-Pan Sticky Korean Gochujang Chicken
Last modified: September 8, 2026