
Gluten-Free Pumpkin Dump Cake One Pan, Ten Minutes of Prep
 • September 29, 2026
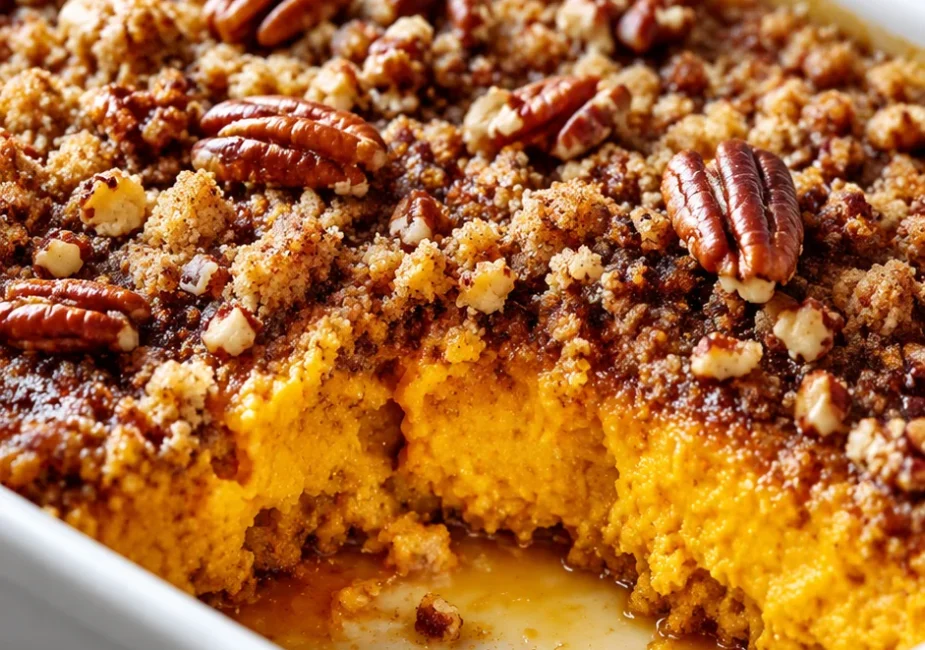
Most pumpkin dump cakes have a top layer problem. You get patches of dry powder sitting next to patches that bake into a soft, gummy sheet, while the filling underneath sets perfectly fine. The oven did its job. What went wrong is the loose cake mix sitting on wet filling, doing whatever it felt like.
Fix that, and the rest of this is about ten minutes of your attention. Warm, generously spiced pumpkin cake with a buttery crumb top that keeps the house smelling like cinnamon long after it comes out of the oven. Nobody has to know there’s no gluten in it.
Why You’ll Love This Gluten-Free Pumpkin Dump Cake
- One pan, start to finish. Ten minutes of mixing and scattering things, then the oven handles the rest. No frosting, no layers, no second bowl to wash.
- It starts from cake mix on purpose. That’s what keeps a dump cake tender in about fifteen minutes of effort. Pick a gluten-free mix you’d actually eat straight from the box.
- The top stays two distinct layers. This isn’t a one-bowl batter cake. The filling sets soft and the topping bakes into a separate crumb — and pressing the dry mix into a damp, even sheet first is what keeps that separation intact.
- Pumpkin and warm spice carry the flavor. Puree, pie spice, cinnamon, and brown sugar on top get you an actual pumpkin cake, not a cake that tastes like flavored syrup.
- Cheap by the slice. One can of pumpkin, one box of mix, and stuff you probably already own. Twelve squares for a fraction of what a bakery cake runs you.
- Works for a mixed table. No separate gluten-free cake at the birthday party while everyone else eats the good one.
Recipe Card Summary
- Prep time: 10 minutes
- Cook time: 45–55 minutes
- Total time: 60 minutes
- Servings: 12
- Estimated nutrition per serving: ~290 calories, 44 g carbs, 3 g protein, 13 g fat, ~4 g fiber — an estimate only, and one that moves a few calories either way depending on which brand of mix you buy.
Ingredients
For the filling:
- 1 (15-oz / 425 g) can pumpkin puree, at room temperature, undrained
- 2 large eggs
- 3/4 cup (150 g) granulated sugar
- 1 tsp pumpkin pie spice
- 1/2 tsp ground cinnamon
- 1 tsp vanilla extract
- 1/2 cup (120 ml) milk
- 1/2 tsp baking soda
- 1/4 tsp fine salt
For the topping:
- 1 (15-oz / 425 g) box gluten-free yellow cake mix, dry
- 6 tbsp (85 g) cold unsalted butter, cut into roughly 15 small cubes
- 1/3 cup (65 g) light brown sugar
- 1 1/2 tsp pumpkin pie spice, or 1 tsp pie spice plus 1/2 tsp cinnamon
- Optional: 1/2 cup chocolate chips or chopped pecans
Notes on the ingredients:
Use a cake mix you’d be happy eating on its own — this recipe can’t hide a mediocre mix, because roughly half of what you’re eating is the dry stuff. King Arthur Baking and Bob’s Red Mill both make solid gluten-free yellow mixes.
If anyone at your table is dairy-free, read the box before you buy. A good number of gluten-free cake mixes list nonfat dry milk among the first three ingredients, and it’s not obvious from the front of the package.
Equipment
- 9×13-inch (23×33 cm) metal baking pan
- Parchment paper, large enough to hang over the sides
- Large mixing bowl and a whisk
- Measuring cups and spoons
- The back of a spoon (genuinely load-bearing here)
- Cooling rack and a sharp knife
Instructions
1. Heat the oven and line the pan.
Set it to 350°F (175°C), convection or conventional. Line the bottom of your metal pan with parchment, letting the long sides hang over. The butter and brown sugar on top caramelize right where they meet the pan, and that sticks to bare metal even after a careful greasing.
2. Whisk the filling, then stop.
Dump the pumpkin into a large bowl. Add the sugar and whisk the two together for about 30 seconds, until the sugar dissolves and the puree loosens. Then whisk in the eggs, pie spice, cinnamon, vanilla, milk, baking soda, and salt. Combined is the goal.
Here’s the order-of-operations thing: sugar goes in before the eggs, not after. Dissolving it into the pumpkin first takes thirty seconds, whereas adding eggs first leaves you chasing little sugar lumps through a wet batter with nowhere for them to go.
3. Pour and smooth.
Spread the filling into the pan and smooth it into all four corners with a spatula. You want an even bed about 3/4 inch deep. The topping layer depends on it, so level it out.
4. Cover with the mix, then press it into a damp sheet.
Scatter the whole box of dry mix over the filling in loose handfuls, reaching the edges. Then press it down once with the back of your spoon, firm but not hard, all the way across the surface.
This is the step that makes or breaks the top. You’re not compacting the mix into a lid — you’re making sure every bit of it touches wet filling. Where a loose pile of powder rests on wet filling, it steams into paste; where it’s perched above dry air, it bakes powdery. One pass turns it into a continuous damp sheet, and a damp sheet bakes into an even crumb.
In my own testing, this single press was the difference between a proper top and a crust that was half dust, half gum. Do not stir. Dump cake earns its name by not being mixed, and stirring gives you one flat, uniform pudding layer instead of a topping.
5. Dot the butter, then the sugar.
Dot the cold butter cubes over the surface, spacing them so no one square gets a double helping and the corners don’t get skipped. Scatter the brown sugar and the extra spice on top, evenly, all the way to the corners. It should look dotted and a little untidy, not blanketed.
Add chocolate chips or pecans now, after the sugar, so they stay near the surface instead of sinking.
6. Bake.
45 to 55 minutes, until the edges are golden and the center looks set but still faintly tacky. Toothpick in the middle — it should come out clean or with a couple of damp crumbs.
Gluten-free bakes dry out faster than wheat ones, so don’t extend the bake just to chase more color. If the top is darkening too fast, tent it with foil for the last ten minutes.
7. Rest before you cut.
Cool in the pan at least 15 minutes. Warm gluten-free cake has almost no internal structure, and cutting it early means tearing instead of lifting. Once it’s set, pull the parchment up by the ends and cut into 12 squares.
Common Mistakes to Avoid
- The dry mix sitting in loose patches. If the mix lands in piles with wet filling showing between them, you’ll get a top that’s gummy in spots and dusty in others. Press it down once with the back of a spoon so it forms a damp, even sheet before any butter goes on.
- Whisking the filling until it’s smooth and foamy. Pumpkin puree is mostly water already. Beating air into it gives you a dense, tacky filling that never quite sets in the middle. Mix until combined, then put the whisk down.
- Skipping the pan lining. Butter and brown sugar on top glue to metal. Parchment with an overhang solves it in one step and saves you from the first piece tearing.
- Cutting while it’s hot. Fifteen minutes in the pan is the floor, not a suggestion.
- Waiting for a deep golden top. Gluten-free crumb carries its color from the brown sugar, not the flour. Pull it at the first sign of gold and let the carryover finish the job.
How to Store & Reheat
Counter: covered, up to 2 days. In warm weather I’d eat it on day one — the pumpkin filling doesn’t love a humid kitchen.
Fridge: airtight container, up to 4 days.
Freezer: wrap the whole pan or individual squares in two layers of foil, up to 2 months. Thaw uncovered on the counter so the topping can dry off a little.
Reheating: 325°F (165°C) for 10–12 minutes for a pan section, or 30–40 seconds for a single square in the microwave. The oven is the better option because the crumb top re-crisps. If you microwaved it, three minutes back in a 350°F oven puts the texture right.
Recipe Variations & Substitutions
- Dairy-free: Fine, as long as your mix allows it. Check for dry milk powder on the label, then use vegan butter for the dots and unsweetened almond or oat milk in the filling.
- Lower sugar: Cut the filling sugar to 1/2 cup. It still reads sweet because the mix and the brown sugar are doing most of that work anyway.
- Chocolate version: Swap half the topping brown sugar for 1/4 cup cocoa and add 1/2 cup chocolate chips.
- Nut-free: Leave the pecans out, or use pumpkin seeds for a bit of crunch.
- Pie shell version: Pour the filling into an unbaked 9-inch pie crust, top it the same way, and bake at 375°F (190°C) for 45–50 minutes.
- No cake mix at all: Use 1 1/2 cups (190 g) gluten-free all-purpose flour, 1/2 cup sugar, 1 tsp baking powder, and 1/4 tsp salt for the topping. It comes out cakier and a little less crumbly.
A Few Honest Words About What’s in It
This is a dessert built on a cake mix and a can of pumpkin, and I’m not going to dress that up. Most of the carbohydrate comes from the sugar and the mix, and the calorie estimate above reflects that.
What is legitimately real in the bowl: canned pumpkin is a solid source of fiber and vitamin A, and it’s supplying all the moisture the filling needs, which is why there’s no oil anywhere in this recipe. The eggs and milk contribute a little protein, and brown sugar on top brings more flavor than white would at the same volume.
If you eat gluten-free for reasons past preference, the thing worth checking is the label itself. Wheat flour in a product marketed gluten-free is a legal-label problem, and a certified mix gives you that certainty without parsing a paragraph of fine print.
FAQ
Do I need to drain the pumpkin?
No. The undrained puree is the moisture for the filling, and the topping bakes off most of what looks like too much. Drain it and you’ll land somewhere drier and cakier than you want.
Can I make it dairy-free?
Yes, provided your cake mix allows it. Quite a few gluten-free mixes include nonfat dry milk as a primary ingredient, so check before you buy. Then use vegan butter for the topping and unsweetened almond or oat milk in the filling.
Can I mix the filling ahead?
Mix it, cover it, refrigerate up to 2 days. Let it sit out roughly 10 minutes before baking and give it about 5 extra minutes in the oven.
How do I know it’s done?
Toothpick in the center, clean or with a few moist crumbs, plus a top that looks set but a touch tacky in the middle. Then give it 15 minutes in the pan before you trust it with a knife.
Can I use a different pan?
A 9×9-inch pan works and gives you thicker squares — start checking at 40 minutes. An 8×4 loaf pan also works, closer to 50–60 minutes. Glass and ceramic are fine, just plan for a slightly longer bake and skip the parchment, since the pan walls are already doing the insulating.
Can I skip the cake mix?
Yes. Combine 1 1/2 cups gluten-free all-purpose flour, 1/2 cup sugar, 1 teaspoon baking powder, and 1/4 teaspoon salt for the topping layer. It’s cakier and less crumbly than the boxed version, and it holds up well.
Final Thoughts
The press is the whole trick. One pass with the back of a spoon, and the top comes out as a real crumb layer instead of a coin flip between powder and paste. Everything else about this gluten-free pumpkin dump cake is genuinely forgiving — a store-brand mix and a can of pumpkin will carry it just fine.
Make it while the weather still justifies it. It freezes well if you get carried away making two.
What do you serve it with? Cold milk and a scoop of vanilla ice cream melting into the warm squares is our usual, but I’ve never tried salted caramel over the top and I’m quietly curious.
Last modified: September 29, 2026